PYCHARM 2019 & MAYA
Note: This guide is using PyCharm 2019.3.1 and Maya 2018. Your configuration steps may differ or you may see different results. This version of PyCharm is not compatible with the super awesome MayaCharm plugin by Chris Cunningham. It’s a known issue by the creator. Once this issue is resolved, I will update this guide with a walk-through on how to configure and use.
SET YOUR PYCHARM PYTHON INTERPRETER TO MAYAPY.EXE
If you haven’t added the mayapy.exe interpreter then follow the steps below:
1. In PyCharm, launch the settings interface. You can go to File > Settings… or you can use the hotkey Ctrl+Alt+S.
2. Go to the interpreter configuration settings. Project: [project name] > Project Interpreter.
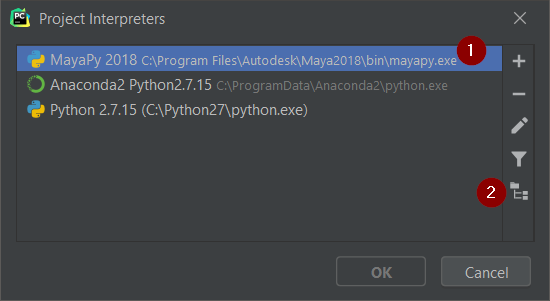
3. Click the Project Interpreter drop down field and select Show all… option. This will bring up a list of all of your interpreters. Click the plus sign (+) button and select System Interpreter. Select the “…” button to add your mayapy.exe interpreter. Mine is located in the following location:
C:\Program Files\Autodesk\Maya2018\bin\mayapy.exe4. You should now see the interpreter added to your list. (I renamed mine to be MayaPy 2018 so it corresponds with the version of Maya.) With the mayapy.exe interpreter selected, click the button that looks like a folder tree to modify the interpreter paths.
5. Click the plus button to add Maya Python’s site-packages location.
C:\Program Files\Autodesk\Maya2018\Python\Lib\site-packages6. Once you click the OK button and you will see PyCharm will start refreshing its resources. If you look at your interpreter paths again it should look like the following:
ENABLE AUTO-COMPLETION FOR MAYA.CMDS IN PYCHARM
Before you start, make sure you have the devkit installed. My devkit location is here:
C:\Program Files\Autodesk\Maya2018\devkitDon’t have the Maya devkit? Follow the instructions to install the devkit found in the README_DEVKIT_MOVED.txt file.
C:\Program Files\Autodesk\Maya2018\devkit\README_DEVKIT_MOVED.txtI had to download mine from the Autodesk Developer Network (ADN). Make sure to scroll down to the devkit section and pick the version that corresponds to your installed version of Maya.
Autodesk Developer Network Page
1. In PyCharm, add the completion folder under the devkit install location. This can be found in a path similar to this
C:\Program Files\Autodesk\Maya2018\devkit2. Once you install the devkit, add it as a source root to your project structure. To do this go to PyCharm File > Settings > Project: <project name> > Project Structure and then click the Add Content Root button and add the folder that contains the stubs for the modules. Mine was located in the following location.
C:\Program Files\Autodesk\Maya2018\devkit\other\pymel\extras\completion\py3. Make sure to mark the added auto-completion folder as Source:
4. Now you should be able to see auto-completion on the maya.cmds and pymel modules.
LAUNCH MAYA PYTHON DOCUMENTATION THROUGH THE PYCHARM EDITOR
Using PyCharm’s External Documentation feature, you can easily launch Maya’s Python documentation. Here’s how to configure PyCharm to do so. (Note: You must complete the section for setting up auto-completion for the editor in order for this to work.)
Let’s configure the external documentation feature for maya.cmds .
1. We need to first remove a library inside of our mayapy.exe interpreter that we configured in the first step. This library causes a conflict that prevents you from using the external documentation correctly. In PyCharm, go to File > Settings > Project: <project name> Project Interpreter and click the folder structure button to modify the interpreter paths.
2. Select the Maya Python path, click the “–” button, and then click the Apply button. You will now notice the path says “(removed by user)”. The Maya Python path I removed looks like such:
C:/Program Files/Autodesk/Maya2018/Python3. Now we can configure the external documentation. Go to File > Settings > Tools > External Documentation.
4. In the panel, click the “+” button to add a new documentation URL.
5. Fill out the fields as such:
Module: maya
URL Pattern: https://help.autodesk.com/cloudhelp/2018/ENU/Maya-Tech-Docs/CommandsPython/{element.name}.html
Note the {element.name} set in the URL. This is a key that PyCharm uses to determine how to fill out that portion of the URL.
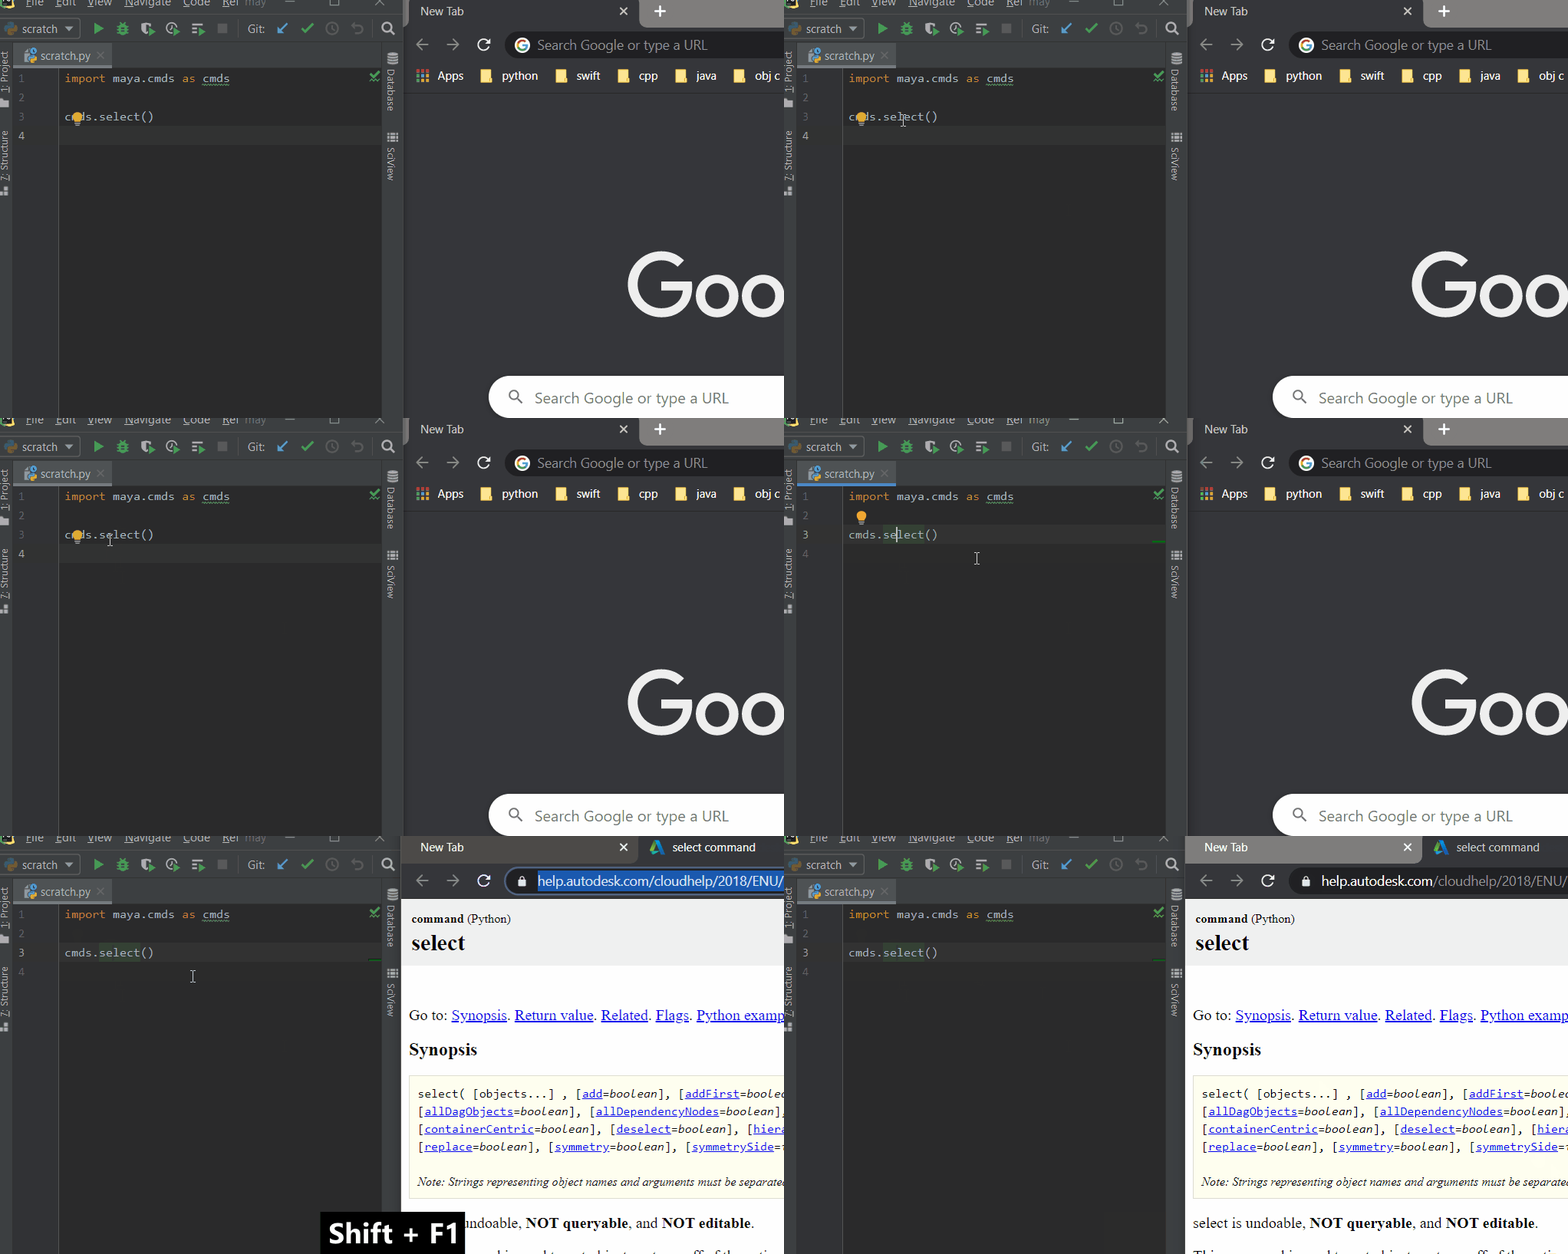
6. Now that we’ve added the external documentation, let’s test it! Put the editor caret over a maya.cmds function and click Shift + F1.


